Showing posts with label Recipe Road Test. Show all posts

Tuesday, 10 June 2014

Tilda Mums Helping Mums Cookbook Recipe Road Test


Tilda Basmati rice has long been a family favourite. When I was growing up, back in the 1980s, proper basmati rice was not available in the supermarket. You had to go to the specialist Indian grocers, which in our case, meant a trip to colourful, vibrant Southall. Those Saturday trips were an adventure; lots of traffic, the parking was a nightmare, the High Street was heaving with people. It was exhilarating. We would then visit one of the grocers there to buy a very big bag of rice. Tilda was the brand my mum would buy, and ever since then I have done the same. I've tried others, but there is something about the fragrance and fluffiness of the cooked Tilda that I prefer.

I was very pleased to hear that Tilda are involved in a charitable campaign to help new mothers and expectant mothers in developing world countries. It is called Mums Helping Mums. To do this, they have posted a free cookbook with recipes donated by many of the UK's most famous mums. Some come from musicians, such as Cerys Mathews who shares her Potato and Tomato Bhaji recipe, Cheryl Baker (of Eurovision winners Bucks Fizz) gives her recipe for Fish Shish Kebabs, singer-songwriter Jamelia has contributed two of her family’s treasured recipes. Equally rock and roll are recipes from Masterchef winner Dhruv Baker (his perfect chicken curry) and Anjum Anand (Chicken and vegetables in aromatic coconut sauce). TV's Nina Wadia, Konnie Huq, Esther Rantzen and Arlene Phillips CBE also contribute.

Tilda as part of this "Mums Helping Mums" campaign are currently selling a special silver Mums Helping Mums 1kg bag of rice (priced £4.49). For every pack, a meal will go to a new or expectant mum to help ensure her good health and nutrition. It is well documented that poor nutrition, particularly in expectant mothers can lead to low birth weight. The resulting low birth weight can seriously affect a baby’s physical and cognitive development. Last year's campaign resulted in a million meals for new and expectant mums. Tilda are keen to beat that target.

I downloaded the cookbook and liked the look of many of the recipes. But the one I decided to try out here as a Recipe Road Test turns out not to involve any rice at all!

The recipe I chose to make was by TV cook, food writer and stylist Jo Pratt. I have seen her on television many times, and always found her to be knowledgeable, engaging and full of great recipe ideas. Her recipes, which I have tried in the past, are always reliable.

Jo Pratt's "Easy Tray Baked Chicken" seemed like a brilliant way of breaking the monotony of regular Roast Chicken for a Sunday lunch. The fact that it was a single cooking implement meal, using only one large roasting tray was another factor. However lovely it is to make Sunday lunch at home, the washing up it creates is ridiculous! Not what you need on a late afternoon or Sunday evening as you contemplate going back to work the next day.

The ingredients were all available in the supermarket, although I bought whole chicken thighs and had to skin and de-bone them at home. We have a thriving rosemary bush in the garden, so I only had to pop out of the back door to grab a couple of sprigs. Thankfully on our arrival back from the supermarket, Him Indoors put the oven on to pre-heat, or I would be telling a more cautionary tale of missed timings and rumbling tummies!

Baby potatoes, chunks of pepper, carrots, onion  and lemon wedges, and whole cloves of garlic were prepared and assembled in my large cast iron casserole dish (a far better fit than my roasting tin, which was far too big). Lemon juice, paprika, rosemary, salt, freshly ground black pepper and olive oil would provide the flavourings. The chicken thighs and pancetta were mixed in with all the other ingredients by my getting my hands stuck in.

As you can see, before the cooking started, I had a wonderfully colourful array of ingredients.

The casserole dish was then heated on the hob, and stirred around to bring the ingredients up to a decently hot temperature before being put in the oven. The lemon, oil and paprika were beginning to give off their fragrances by this point. If only you could have smelly-vision, right?

At the half way mark, the casserole dish was hauled out of the oven, runny honey added, everything was thoroughly mixed together once more, and it was time to start on the home straight.

This was the finished product, before being served up on plates.
 
Our verdict is that this is an easy, achievable meal that anyone inexperienced in cooking can make. It is a very tasty and enjoyable meal, which needs no other accompaniments. We thought it was an excellent alternative to a Sunday roast, particularly for busy people who don't have either the time or energy for the full roast preparation and cooking experience.

I also think it is a brilliant basis for experimentation and development according to your own personal tastes. Thyme or a little chopped sage could be added. You could use up leftover vegetables languishing in the fridge such as mushrooms, courgettes or aubergines. Adaptability will keep it fresh, so you can make it repeatedly and not get bored. 

In fact, we revisted the recipe only this weekend, adding some mushrooms and thyme as we had some in the house. Here are the results:

If you want to download the Mums Helping Mums Cookbook, you can get it for free here: www.tilda.com

Sunday, 23 September 2012

Recipe Road Test: Mallika Basu's Chingri Malai Curry

As I have indicated in past posts, my parents are West Bengal Bengalis, coming from the east of India. And as I have mentioned before, much as I love their wonderful culinary heritage, I've not been gifted with the skill and judgement to cook their food.

So when I discovered Mallika Basu's book "Miss Masala" I was pretty pleased. Not only is this a book attempting to show how good, tasty Indian food does not have to involve slaving away in the kitchen, but Basu is of Bengali descent too!
It turns out that Mallika Basu was born in Kolkata (formerly Calcutta). She came to the UK aged 18 to study, and has lived here ever since. Her journey into culinary literature started off as a blog detailing her experiments with simple, fast Indian cooking. After her studies, Mallika carved out a successful career in PR, and is now a Associate Director for a London PR Consultancy. 

Her book is one of the most useful Indian food books I have seen in a long time. What is special is how it takes the reader/cook through dishes, explaining the ingredients and techniquest, building up the level of difficulty as it goes. It's like a cookery course in book format. In addition, the anecdotes about reconciling the demands of work and a busy social life to find the time for making these dishes are humorous, written with a light and knowing hand. It made me feel like we were co-conspirators, and that I wasn't alone in wanting a rewarding life which also allowed for good food at home.

This is my test of her recipe for  I couldn't find it on her recipe on her blog (which I do recommend) http://www.quickindiancooking.com/ so I am posting a picture of the recipe from the book here: 

Chingri Maach is Bengali for prawns. The ones you can get in West Bengal and Bangladesh really have to be seen to be believed; they are such whoppers, you'd think someone got confused and served you lobster instead!

One ingredient you may not be familiar with is Mustard Oil. This is used very commonly in Bengali cooking. So commonly, in fact, that I found my bottle in Tesco, of all places! You will find that supermarkets in areas where lots of Indians live will stock it. If not, then your local Indian grocery shop should sell it. 


The first step of the recipe calls for making a curry paste. So I had to start by preparing my paste ingredients. 
Then they had to be mashed up into a paste. Stupidly, I thought the blender attachment on my food processor could manage this task. But the small amount of ingredients meant the blades couldn't get a good purchase on all the stuff. 
 
So I had to carry out a small amount of improvisation. I'm not unused to this. Often it's because I've not prepared properly. Or I've made a similar miscalculation. Still, I can't complain, since I've nearly always been able to get myself out of the whole I got myself into. 

I found that by shaking the blender vigorously from side to side and pushing the unblended ingredients back down into the blender as I went, I managed to blend the cubed ingredients into a paste. I had to blitz, stop, mix, push down, blitz, and then repeat again. (Word to the wise: use the food processor part of the machine! Don't waste time and effort!!)

Obviously, none of the above is the fault of the author of the recipe, Mallika Basu. It is all mine. As I've often said, I make the mistakes so that you don't have to!

Eventually, I got my curry paste done. And fragrant and well textured it was too!
  
Next came the frying of the whole spices with the sugar. This is a picture of the spices at an early stage of cooking:


Here you can see the caramelisation of the sugar occurring. As you can see, the sugar is the brown coloured (caramel) droplets in the oil.   

Then the paste has to be added. This does have a tendency to spit at you, because the paste ingredients contain a lot of water and the oil is rather hot. Be careful and hold your body back away from the pan if it starts to get nasty. Keep calm, and try not to worry.

As you cook the paste, you will need to keep it moving, or it will catch and stick to the pan. Put some good music on and bliss out, or put your phone on speakerphone/hands free and have a chat. Just don't leave the pan unattended!

Eventually the paste will change colour. 

Then it is time to add the sauce flavour base: the chilli, turmeric and chopped tomato. You will see the colour changes almost as soon as you have mixed it all up.

As Mallika says; here is the tricky part of the recipe. You need to mellow the spices and cook it all gently without burning. Put the pan on the smallest ring of your hob, and turn the heat really low. Burnt garlic and ginger will ruin the taste of the overall dish. Keep an eye on the pan and stir regularly. You will be able to smell the contents change in character. At the beginning you will be able to sense the ingredients; you will get tinges of the smell of each. As you get to the point where they are cooked, they will meld together. 
We then have to add the coconut milk. 
This will need very thorough mixing, to ensure all the flavours and smells permeate the coconut milk thoroughtly. You will not want unmixed sections, as these will taste bland and uninteresting.


Then add your prawns. Frozen prawns must be defrosted beforehand, or you will have to radically increase the cooking time.

After the allotted cooking cooking time, your prawns will be perfectly cooked, and will have taken on the flavours of the sauce

Serve with boiled/steamed Basmati rice.

Verdict: This did taste like an authentically Bengali curry. The gravy is flavoursome and goes well with rice, but equally would compliment breads such as paratha or chapati. The dish has balanced 'spicy' taste, but not mountains of heat. To me, "spice" is not about heat alone; it is about the tones of classic Indian spices which creates tones, reflections and counterpoints. The chilli powder did provide some heat, but it was subtle and cooked into the sauce in a very pleasing way. Fans of vindaloo and phall may want to either up the amount of chilli powder or substitute for 2 slitted or dried chillies added in at the stage where the coconut milk is added. Even though the amount of sugar added is small, it does provide a sense of sweetness which permeates the dish beautifully. It is a quintessentially Bengali element to the finished dish. This is a highly effective recipe which is in places work intensive, but that the work rewards the cook in the final result. 

Saturday, 14 July 2012

Recipe Road Test: Ching He-Huang's Beef and Chilli Bamboo Shoots in Little Gem Lettuce


My trip to China and Hong Kong was one of the most brilliant experiences of my life. (For my tips on travelling around China, see my previous blog post: http://snigskitchen.blogspot.co.uk/2012/07/top-tips-for-travelling-round-china.html) The food was a real highlight. One leg of our trip involved a cruise along the Chiang Jiang river (better known to Westerners as the Yangtze). We arrived in Yichang in good spirits, but also with something of an appetite. Our tour guide wondered what we wanted and offered the option of 'burgers, KFC or Pizza'. We were puzzled and interjected 'Chinese food, please!'. He was surprised. He told us that usually all his clients complain that they've had nothing but Chinese food for three days and ask to be taken to McDonalds, Pizza Hut or KFC (as already mentioned). 

It's funny, but after three and a half weeks of travelling around China, my appetite for its flavours remains undimmed. The food is varied, vibrant and enticing.  I feel even more energised towards making Chinese dishes to taste that wonderful spectrum of texture and flavour.

Having said that, eating all that wonderful food has taken its toll. My clothes are ever so tight since I left London! One skirt I had packed can just about be done up, but only when I breathe in. It was not always thus! So I wanted to find something tasty but a little on the healthy side.

I've already written on this blog about Ching-He Huang's book "China Modern" before, when I road tested her recipe for Nutty Chicken Cool Noodle Salad (see post here). It is a favourite recipe. So it is to her book I have returned and decided to have a go at Beef and Chilli Bamboo Shoots in Little Gem Lettuce. You will find it at page 17 of her book. A similar dish was served up on Come Dine With Me, so you will find a version of the recipe here:

This dish reminds me of 'San Choi Bao'. It is a dish I first had at Deptford Malaysian-Chinese Restaurant Kaya House, back when it was run by Ambrose and his lovely wife. Theirs is a vegetarian version, which is such a wonderful combination of flavours, hardened carnivores do not miss meat. They put in some 'secret' ingredients, including tinned pickled cabbage. 

Other versions use pork, or chicken and I've even read that in some restaurants, they use the meat from the Peking duck as part of the filling:

So after shopping for the ingredients, I was ready to get cracking!

Ching-He Huang's take on this dish involves using Little Gem lettuce rather than iceberg. I am deeply grateful to her for this. It is FAR easier to remove the leaves of a Little Gem and get something resembling a small plate/shallow cup. If I had to deal with extracting intact leaves from an Iceberg lettuce, there would have been chaos here at Snig's Kitchen. I don't have the patience or the knife skills or the care. There would have been lots of torn leaves, swearing and perhaps drawn blood from a not-quite-so-near-miss with a knife. This variation is a heartily recommended!

As I have previously suggested in my Kitchen tips - it is a good idea to get all of your preparatory work done in advance, before you start cooking. It may take a little longer, but makes for a much more relaxed experience of cooking. This way there are no panics about not having peeled this, or chopped that or diced this at the time it needs to go in the pot.

One annoying thing was having to peel the individual segments of orange. Yes, Ching does recommend Mandarins. But I couldn't find any, so had to make do with Satsumas. However, I doubt that removing the membrane from the segments would have been any easier had I been able to find Mandarins. This is a highly fiddly step. My domestic goddess status has never been assured, so if some of the segments fell apart, I was neither going to get upset or start again. Broken segments? I think we can survive! I am not on Come Dine With Me and neither am I a professional chef!

Once the ingredients were prepared, the dish was a breeze to cook. Perhaps I could have made it in our households' wok, but the bottom is uneven and I was afraid to lose control of it and its contents. Far better to use a bog-standard non-stick frying pan and stay on top of things. I could control the heat, the stirring and weight of the overall contents. If you are bigger than me (chances are you are - I am a munchkin), you need not worry about this.

So I started by frying up the 'holy trinity' (ginger, garlic and chilli) in the frying pan. They sizzled, giving up their flavours and aroma, promising a great supper in due course.

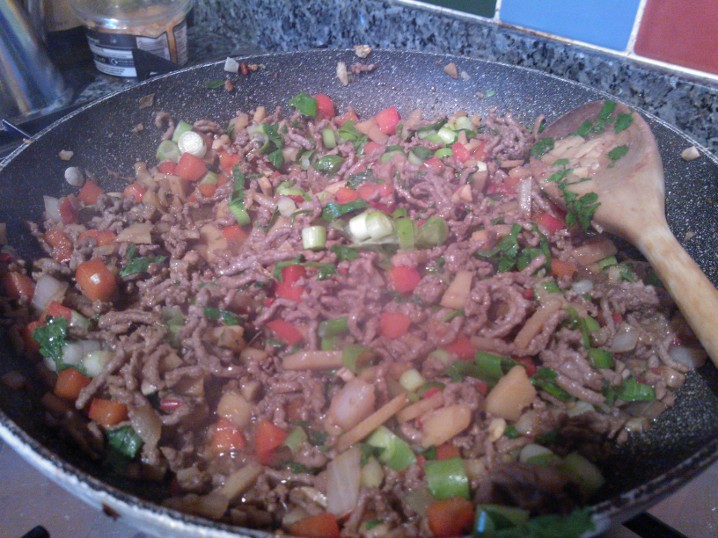
Next came the minced beef. I bought some low fat minced steak meat. I have found that cheap mince is a false economy. There is too much water and foamy gunk which comes out of cooking cheap mince. I don't want that rubbish in my dinner! So best to pay more for stuff which has had the fat trimmed off and has as little water added as possible. Better still, make your own. I DO have a mincer which gets used reasonably often, but this time I decided against the extra work of using the mincer and cleaning it out afterwards. 

Next up came the onions and mushrooms. My only real deviation from Ching's original dish was the addition of two thirds of a red pepper, diced. I could not have sold the dish to Him Indoors as a supper dish without a little more taste, colour and flavour. It is a sympathetic ingredient which thankfully worked rather well.

As the mince browns, it needs turning over, and then the sauce ingredients (light soy sauce and sesame oil) need to be added and mixed thoroughly. These will infuse the ingredients and get cooked out to add moisture and subtle flavour to the dish. 

The spring onions and coriander are added at the last moment. They don't need much cooking, and you want to keep their integrity. 

The last task is  the assembly. The beef mixed is divided up between the Little Gem leaves, and them topped with the orange segments and chopped peanuts. A simple operation, but looks extremely effective and colourful. I served up the dish with hoping that it tasted as good as it looked.

So what is the verdict? Well, it is remarkably tasty. And the variety of ingredients gives a good variation of texture in each bite. The sweet but slight tartness of the orange plays against the crunch of the Little Gem and the deeper tastes of the beef. An enjoyable, flavourful, healthy dish.  Because you can eat it with your hands,  you don't even need to get any cutlery dirty! So it saves on the washing up! 
Thanks Ching! Another great meal from your debut book!

If you want to buy China Modern, the ISBN number is 978-1-85626-673-4, and it is published by Kyle Cathie.

For those of you who think lettuce or Little Gem are dull, there is another variation I found online. This involves serving the beef in hollowed out tomatoes

Sunday, 25 December 2011

Recipe Road Test: Delia's Mincemeat Raviolis


On this grey Christmas day in London, I'd like to wish you all a very special day. I hope you enjoy the merriment, company and festivities of the day. We will be cracking open the champagne later to enjoy a Merry Christmas!

Tomorrow I am off to spend the day with my mother in law who will be cooking us a roast dinner (beef, since you ask) with all the trimmings. A proper roast dinner involves a terrific amount of hard work and planning. So I asked whether I should bring the pudding. It turns out no-one is all that keen on Christmas pudding or Christmas cake. And that is pretty damn good, as I didn't plan ahead and make either over a month ago. Instead, I said I'd bring mince pies. Homemade ones.

What was I thinking?! You all know about my fear of baking. I'm just terrible at it. Cakes sag in the middle, muffins are gluey, bread rock hard. It's desperate stuff. My oven and I don't get along. I am fairly sure that it is lying to me about the temperature it is at too.

My very good friend Chris is something of a baking aficionado. He can make cakes, pastries, savouries, cupcakes. The lot. He has patience and care and skill. I asked him how to get out of my mince pie predicament. He put me onto Auntie Delia's recipe for Caramelised Mincemeat Ravioli. The advantages, he said were that firstly the pastry was 'easy' (I was sceptical), but secondly, that it could be made slightly in advance, stored in an airtight container, and grilled with the icing sugar on top when needed. This second advantage sounded good to me.

So, the recipe can be found in 'How To Cook: Book One' but is also currently available at:

My first decision involved the mincemeat. Make my own or buy from the shop? When I looked into what was involved in making my own mincemeat, I was more than a little frightened. One recipe made up three whole pounds of the stuff – what was I going to do with all that mincemeat? Where on earth would I put it??

Again, Chris came to the rescue. He suggested buying a jar of mince and freshening it up. He suggested orange zest or extra dried fruit. I decided to go all out on the booze front (after all, it is Christmas!!). So I took some extra raisins and dried mixed fruit peel and marinated it overnight in a good couple of tablespoons of brandy.


Once marinated, I mixed up in a bowl with my jar of mincemeat. I've told you my secret, but who else is going to know when I serve them up tomorrow?

Now came the truly terrifying part. The pastry.....

Delia recommends keeping the butter as cold as possible by wrapping in foil and refridgerating. So far, so good. Even I can manage that!

Then she recommends sifting flour and salt into a bowl and grating the butter into the flour. Having spoken to my mother in law about pastry making, it appears that the 2 biggest barriers to decent pastry are 1. overworking the pastry and 2. allowing the pastry to become too warm. Clearly, this grating process is to ensure the butter stays as cold as possible for as long as possible whilst increasing the surface area to volume ration enough that combining butter and flour becomes as easy as possible.

My only criticism of the method is putting in all the grated butter in at once. I found the sheer weight of butter started squashing itself down. Instead of fine gratings at the bottom, I ended up with lumps.

My advice therefore, is grate butter a few minutes at a time and mix thoroughly into the flour with a palette knife or spatula before grating again.

The next stage involves adding a small amount of water (2-3 tbsp) to the mixture and starting to work together with palette knife or spatula to bring together. Perhaps my mix was particularly dry, but I needed nearly 6 whole tablespoons of water before any coming together occurred. Delia says more moisture may be needed, but I was disconcerted by needing so much more than the recipe stated. I hoped for the best.....

I managed to get the dough together, then bagged it up and put it in the freezer to chill. I was glad to have got the pastry making stage out of the way and breathed a sigh of relief!

After half and hour (during which I preheated the oven), I retrieved my pastry. Can't say it looked good, but I hoped it would hold together.

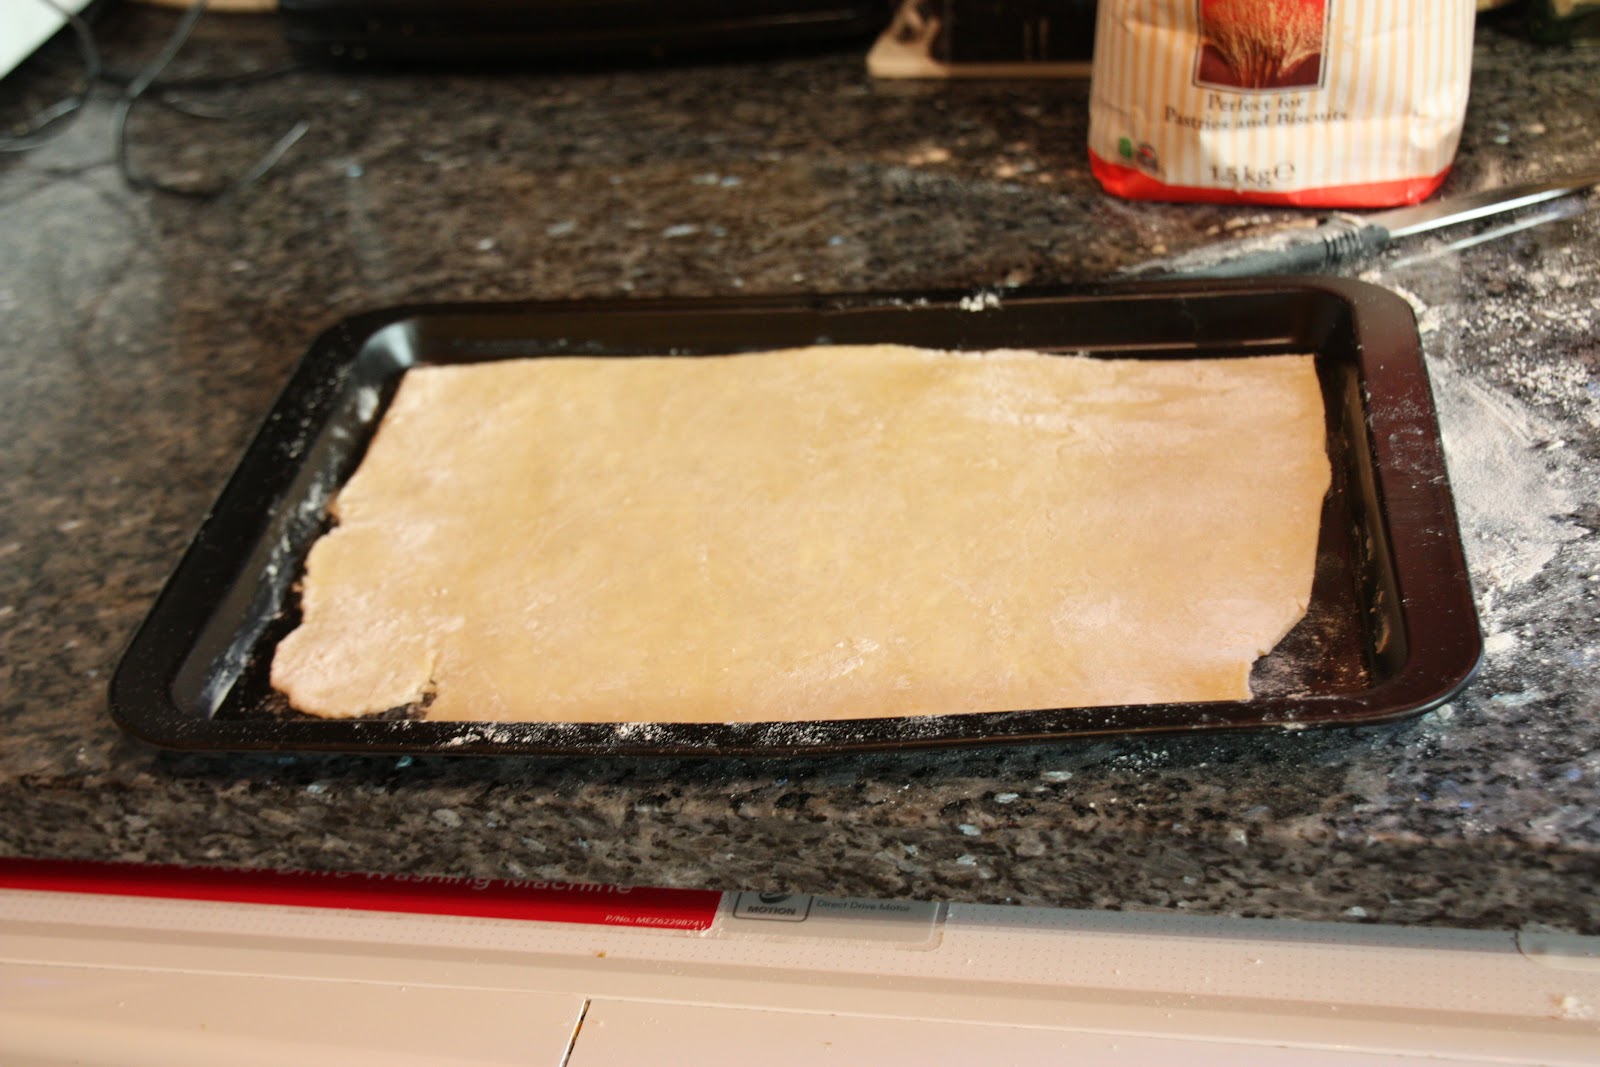
I managed to roll out the bottom sheet.

I then laid it out on a baking sheet.

Then it was time to egg wash the pastry.

Next was dotting my mincemeat on the pastry sheet.

Then I had the second pastry sheet to roll out. I will confess this took some repairs!

Eventually I laid my second sheet over the mince and pastry.

Time to squeeze down, shape and use a pastry wheel to cut into individual raviolis.

Then to bake. I have to say I was rather impressed with my results..... Although it won't be until tomorrow when I sprinkle icing sugar and grill to get the caramelised effect will I know whether they truly succeeded or failed.

But not bad so far for a sad failure at baking, eh?

Merry Christmas!