Saturday, 29 October 2011

Snigdha's Superfood salad – version


One of my great inspirations in life is music. It comforts me, energises me, calms me, and speaks to my soul. How strange vibrations of air can have such an effect, I don't know, but gratefully accept.

I am quite partial to reggae music of the 1970s, and in particular dub. Dub records started life as pared down reworkings of hit songs with the vocal tracks removed, designed to be used at dances to keep people moving in a rhythm for up to half an hour at a time. Not as artistically valued as the original song, but useful for entertainment at sound system parties.

Eventually, however, through the artistry of some of the top producers such as King Tubby and Lee Perry they became legendary; sonically wide canvases with thumping bass and superb sound effects. Some even sound like you are listening to them underwater! If you were to listen to just one classic dub album as a result of this post, let it be Garvey's Ghost by Burning Spear, which is the dub companion to their classic Marcus Garvey album (both totally worth your hard earned – guaranteed!).

Although much of Lee Perry's Black Ark output of the mid 70s is worth listening to; my favourite is the Super Ape album, which if you happen to buy has 'Croaking Lizard' on it, which is Prince Jazzbo and the Upsetter's 'version' of Chase The Devil by Max Romeo. (Anyone who researches this may find a certain popular dance act from the 1990s totally ripped it off!)

Anyway, coming back the point I was intending to make, these dub records were often called 'Versions'. I reckon you could say Mark Ronson got the idea for the title of his debut album from this idea. My thought is that any recipe can be endlessly remixed, twiddled and re-arranged to produce amazing and interesting 'versions', just in the spirit of those sonic duppy conquerors.

Some time ago I posted my take on Leon restaurant's Superfood salad, in itself a 'version', which can be found here: http://snigskitchen.blogspot.com/2011/06/more-use-for-butternut-squash-snigdhas.html Well, since then, I've revisited the idea and come up with a new 'version'. Remixed without the feta cheese (which Him Indoors is not so keen on) and having tweaked the superfood mix to include purpletastic beetroot, this is another healthy but tasty midweek supper salad or a take-to-work lunchtime dish (layer up and do not dress if doing so). It is a meal in one.

I also substituted quinoa with a grain mix made by Pedon which cooks in 10 minutes. I found it on my wanders round Tescos, but am convinced is available elsewhere. This is a partially cooked mixture of 5 different grains, which is broken down by the body slowly to release its energy.

(Serves 2)

Ingredients:
Fresh mint leaves, 1 handful, roughly chopped
Fresh coriander leaves, 1 handful, roughly chopped
Fresh rocket leaves, 1 handful
Frozen or fresh peas, about 1 small mug full
3 spring onions, cut into 1” slices
Broccoli florets, quarter of a head, cut into florets
Cauliflower florets, quarter of a head, cut into florets
Cooked beetroot, about half, finely sliced
Half a cooked Butternut squash, cut into bite sized cubes
50g multi grain mix

Topping ingredients:
Pancetta (optional), about 75g cubetti de pancetta
Sunflower seeds, 1 tablespoon
Pumpkin seeds, 1 tablespoon
Sesame seeds, 1 tablespoon

Dressing ingredients:
Olive oil, about 2-3 tablespoons
1 Lemon - juiced

Method

  1. Cook the butternut squash as per my instructions in my previous post: http://snigskitchen.blogspot.com/2011/06/how-to-roast-butternut-squash.html
  2. Then cook the multi grain mix. First put the kettle on. You aren't making much, so use the smallest pan you have. Cover the multi grain mix with boiling water and boil for 10 mins. Drain, rinse with cold water, drain again and spread out on a dry plate to lose some excess moisture and ensure the grain cools down.
     
  3. Now cook your broccoli, cauliflower and peas. You can steam or boil them. I do them in the same pan, boiling the broccoli and cauliflower in plenty water for 5 mins and then adding the peas for the final minute. Drain and rinse in cold water. Take the cauliflower florets out and save separately.


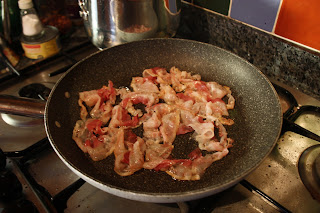
  4. If you are having the pancetta, dry fry in a pan until thoroughly cooked.
  5. You will see the pancetta slices are going brown around the edges. Remove from the pan and place on kitchen roll on a plate to absorb any excess fat.
  6. Now cook the seed topping. Heat a small pan until warm. Add the seeds. Cook for 2-3 mins, stirring as you go to achieve even colour. When some of the seeds start popping, turn the heat off straight away and transfer to a bowl.
  7. Whisk up the dressing with fork in a mug. Keep until needed.

     
  8. Now layer up the salad. Boiled veg first. This will be followed by cooked grain and salad.


  9. Now add the cauliflower, spring onions, squash, beetroot and herbs.


  10. Add the Pancetta (if using).
  11. Re-whisk your dressing and drizzle all over.
  12. Now add the seed topping.
  13. Serve immediately and enjoy!

Wednesday, 26 October 2011

Gluten Free Chocolate Brownies: A guest post by Matt Seys-Llewellyn


To my immense surprise Snigdha has kindly offered me a guest slot on her blog to cover a bit of baking because she claims it “isn’t really her thing”.  She’s not alone; sadly most people give up because of a few bad experiences with burnt bits or a dry loaf, which is a shame because cooking is all about having the confidence to experiment (and be willing to eat the failures where possible).
In the hope of encouraging this experimentation I’ve decided to reveal the recipe for my famous chocolate brownies.  Partly inspired by an Austrian friend’s incomparable chocolate cake (thanks Kathy!), and adjusted to be gluten free, they are gooey, satisfying and almost impossible to mess up.  The cooking time required is mercifully short and it is good practice for anything more complicated.   The most important thing is getting the oven temperature right before you put the baking tray in, so turn it on before you start doing anything else!!!

Ingredients (for 12-14 brownies)
150g unsalted butter chopped and cubed
270g chopped chocolate (220 dark, 50g milk)
3 large eggs*
75g rice flour
125g dark muscovado sugar
150g of chopped glacé cherries (quartered. Less likely to stick to the baking tray)
1tsp vanilla essence
Tsp of cinnamon
Pinch of sea salt
*hypothetically you could do this in a vegan way with guar gum, but the magic in this recipe really comes from how the eggs bind the flour together.

Instructions
1)      Preheat the oven to 180 degrees C/ gas mark 4

2)      Line the base of a baking tray of about 20cm by 20cm by greasing the sides and base with some of the leftover butter to stop it sticking to the sides.

3)      Melt the chocolate and the butter together in a bain marie (a pan of simmering water with the bowl full of chocolate/butter sitting in the middle of it).  Melt the chocolate SLOWLY and stir frequently.  You can also cheat by doing it in a single bowl in the microwave if you have asbestos fingers and do it for short bursts at a time.  In both cases stir together gently, adding no more than 50 grams at a time, and once everything has melted together turn off the heat.   I find it is better to do most of the chocolate before you start adding the butter.
4)      Beat the eggs, sugar and vanilla extract together in a separate bowl.

5)      Stir in the flour, cinnamon and that dash of salt to the eggs and then, when the flour lumps have been beaten out (five minutes work) you can add most of the chopped cherries.   Then fold in the chocolate mixture until it is all mixed together to your satisfaction.  Use oven gloves when pouring this in because, even with time to cool, the chocolate will often resemble molten lava for heat and texture.


6)      Pour it all into the pre-prepared tin and give it a tap to ensure that the liquid is level.  Sprinkle on the remaining cherries, if this is your thing, then place in oven.


7)      Aim to cook for about 15-20 minutes only.  Don’t worry if the middle is squidgy as it will continue to cook in the tin once you remove it from the oven. Remember: the aim is not to overcook the mixture, or else it becomes dry rather than gooey.  You can test for optimal gooeyness by gently pressing the middle of the mixture with the back of a spoon – it should be soft without being a liquid or paste consistency.

8)      Leave to cool and then cut into the number of pieces of your choice.  I find I get 12 very comfortably with my sized baking tray – they can be a little crumbly so great big slices are not the aim of the game (whatever the temptation).

9)      They should keep for up to four days in an airtight tin...if they haven’t been scoffed in one!
You can tweak the recipe to your own mix of chocolate and flavours – for example with candied ginger in place of the cherries if you replace the cinnamon with a tsp of ground ginger to help it along.

 The perfect autumnal treat: happy baking! 

 Matt

Snigdha says:

My thanks to Matt for his wonderful guest post! I am really grateful to him for the time and effort he has put into the brownie recipe, complete with photos and step-by-step instructions.

I am very lucky to have lots of foodie friends to bounce ideas from, and Matt is no exception with his excellent knowledge of French food and baking.

The brownie recipe is one I will try in the kitchen. Heaven knows I've tried making scones, muffins, bread and cakes, but all ended up just a little dodgy.  Perhaps the more rough-and-ready technique for making brownie mix will work better for me. And I'll remember to preheat the oven too!

Thanks again, Matt!

Saturday, 22 October 2011

Snigdha's thoughts on Autumn and Winter food


I have been told that this coming week will be warm in the UK with temperatures reaching an unseasonally warm 20°C. Thank goodness, say I, because I don't know about you, but this last week I've been freezing! Before the heating went on at work, I had to scrounge a fan heater to warm my cold little fingers (they were so cold I actually found it hard to type!). At home we've had the central heating on for the first time. Him Indoors and I got the Winter duvet out of its storage home in a vacuum sealed bag. And I have even got my leather gloves out of their annual Spring/Summer retirement.

If you are like me, then cold weather demands hot food. Not just hot dinners, but filling, internally warming, comforting dinners. Often the food that your mother used to make. The meals that are beyond food fashion and mere trends. Stews, casseroles, pastas, curries..... mmmmm, I'm feeling hungry just thinking about them!

I have dug out the slow cooker and cast iron casserole dish from the back of the kitchen cupboards. They have been promoted to the front, and the salad bowls have been relegated. We have made a sausage and ale stew, yet another risotto and my Spanish Cocido (recipe can be found here) this past week to warm the cockles of our hearts before they got too chilled.

So I was delighted to find that Hugh Fearnley-Whittingstall has been in very much the same mood. Not only because it means that I am not the only person to have found the recent weather cold (some colleagues are still not wearing a coat to work!), but because he has been kind enough to share some wonderful winter warmer recipes with readers of The Guardian. You can find his article, complete with recipes here:

I am particularly looking forward to making his Goulash recipe. Believe it or not, the last Goulash I had was in the bright sunshine in a Konobe style restaurant high up on the city walls of Dubrovnik! It was tasty and sustaining after a morning of tramping the streets and climbing up the steep inclines. However, I know that the experience of enjoying this wonderful Eastern European dish (hailing originally from Hungary) will be all more enjoyable in inclement weather.


I also discovered in my online research that it is possible to make tasty stews and casseroles without searing the meat first. Thanks to John Willoughby, I can now save quite bit of time in the evenings when I don't want dinner to take hours. This tip will also help me in the morning when loading up the slow cooker; I end up cooking in my dressing gown seeping up all the frying aromas then desperately showering so as not to smell like a kitchen at work! Mr Willoughby's article can be found here:

The weather outside may be frightful, but that does not mean what you eat need not be delightful. I hope that some of you will find my previous recipes such as the Marrakech Lamb recipe can be found here just the ticket for this season. Happy cooking and happy eating!

Monday, 17 October 2011

Snigdha's Sweetcorn and Dolcelatte Risotto


Serves 2
Ingredients:

16 fresh sage leaves
4-5 tbsp finely freshly grated parmesan cheese
75g Dolcelatte cheese (or equivalent, like Saint Agur or Gorgonzola), crumbled or cubed
2 cobs of sweetcorn
1 small onion (1 shallot would be preferable), finely diced
2 cloves garlic, very finely diced
750ml stock, preferably homemade (cube made stock will be too salty with the blue cheese)
140g Arborio risotto rice
125ml dry Vermouth
Olive oil

Optional for meat eaters: 100g thinly sliced pancetta


Method:

  1. To prepare the corn, working very carefully and with the knife moving away from you, remove the niblets from the cob.

  2. Heat the stock in a pan. Add the corn and cobs. Cook for 5 minutes. Then drain, reserving the stock. Return the stock to the hob, put on a very low heat and cover. Put the niblets in a bowl/dish until it is time to put them in the risotto. Discard the cobs.
  3. Heat about 2tbsp olive oil in a pan (large enough to make the finished dish). Now add the onion and fry gently for 5 mins. 
     
  4. Now add the garlic to the pan, and fry for another 5 mins. Please do not allow the garlic or onion to brown, lowering the heat if needed.

  5. Add in the rice. Keep stirring and cook for about 1-2 min to coat the rice in the fat and toast it through.

  6. Now add the Vermouth. Increase the heat. Stir frequently until all the alcohol has disappeared. I would say this takes 2-3 mins.

  7. We are now at the stock adding point. Take the lid off the stock pan. Add the first ladle of stock. You will now be 25 mins (or thereabouts) from the rice being cooked and 30 mins from serving up. Set a kitchen timer to 25 mins from this point. Stir the risotto several times until the stock is completely absorbed. Be careful, once the liquid is gone, the rice will be liable to catch and burn on the bottom.

  8. Reduce to a low heat. Add stock, ladle by ladle, stirring as constantly as possible (to release the starch from the rice) as you go.
  9. Once you have 5 mins to go on your timer, add the sweetcorn. You may still need to add in stock, depending on the absorption power of your rice or the power of your hob. Try the rice from time to time to see how soft it has got. It should not taste grainy.
     
  10. As it gets to a soft cooked texture (a little mushy), stop adding stock. Allow all the remaining liquid to cook off. You do not want any soupy stock at the bottom.
  11. Now turn the heat off. Take pan onto another surface. Add the parmesan. Stir thoroughly into the risotto until mixed. Put lid on pan and allow to rest for 4 mins.
  12. When serving up, put a few small chunks of the blue cheese in the bottom of the serving bowls and top with some risotto. Then add some more, and again, top with more risotto. You want bits of blue cheese dotted through the bowl of risotto, which melt slightly from the heat from the rice.

  13. Now top with the sage leaves (see below) and if you wish, a little extra parmesan.


    To make the sage leaf topping:
    Heat some olive oil in a frying pan (non stick). Add the whole sage leaves. They will sizzle briefly before changing colour. When they have gone a rich dark green, they are done. Dry on kitchen paper.


    Optional topping for meat eaters:

    If you are a meat-eater then dry fry the pancetta in a non-stick pan. You will know it is done when it goes brown and crispy but is not burnt. 

    Remove from the pan and place on a plate covered in kitchen roll to absorb the excess fat. Use to top the dish with the sage leaves.

Friday, 14 October 2011

Recipe Road Test: Ching-He Huang's Nutty Chicken Cool Noodle Salad

In previous 'Recipe Road Test' articles, I have tried to recreate dishes based on the written instructions of those more experienced at recipe writing than I. I've been trying to learn what makes a good recipe. Obviously, taste is the most important criterion; if it don't taste good, it's never going to be eaten the first time, let alone be cooked the second! However, other important factors are how easy the dish is to make overall and how much time it takes. Another consideration is how enticing and attractive the dish looks, because after all, we eat with our eyes first.

This dish makes salad seem like a treasure hunt, with its varied vibrant colours. Although the dressing is quite calorific, it is indecently tasty, and given the rest of the dish's low fat count, can be forgiven.

We made this dish having had roast chicken the day before. It is a completely excellent way of using up leftover cooked chicken. Chicken sandwiches are all well and good, but to essentially get a 'free dinner' out of your Sunday roast seems like getting a wonderful present.

Ching-He Huang's recipe comes from her first book, China Modern. Her concept for the book is to concentrate on the different influences shaping contemporary Chinese food; ethnically Chinese living in Europe or America are influenced by Western flavours and techniques, hence broadening the cuisine. China's neighbours add their own special touches such as different and diverse spices or more tropical ingredients. Her recipe is set out verbatim below, with the road test to follow.

Nutty Chicken Noodle Salad

Serves 2 as a main or 4 as a starter

Ingredients:

400g dried whole-wheat flour noodles
toasted sesame oil for dressing
½ cucumber, cored and cut into long strips
1 large carrots, cut into long strips
1 yellow pepper, deseeded and cut into long strips
1 mango, stoned and cut into long strips
1 spring onion, cut into long strips
350g cooked skinless chicken breast, shredded

For the peanut dressing:
6 tbsp olive
1 tbsp sesame oil
1 garlic clove, crushed and finely chopped
1 tablespoon minced ginger
1 red chilli, deseeded and chopped
2 tbsp light soy sauce
2 tbsp rice vinegar
3 tbsp crunchy peanut butter
1 tsp brown sugar
juice of 1 lemon

Handful of chopped roasted peanuts (optional)

Preparation time: 10 mins plus refridgerating
Cooking time: 30 mins

Method:

  1. Cook the noodles according to the pack instructions, then drain and rinse in cold water. Drizzle with a few dashes of sesame oil to keep them from sticking together. Place on a plate and cover with clingfilm and chill in the fridge whilst you slice and prepare the rest.
  2. In serving bowls, place equal amounts of cooked noodles. Then add layers of cucumber strips, carrot strips, yellow pepper, mango slices, spring onion strips and shredded chicken. Cover with clingfilm and refridgerate for 30 minutes. This salad tastes refreshing when cold so refridgeration is a must.
  3. When ready to serve, whizz all the dressing ingredients in a blender and pour a generous amount over the salad. For an even nuttier flavour and added crunch, sprinkle some chopped roasted peanuts over the top. Enjoy with chilled Chinese beer.

I started off by cooking my noodles. Having not had the opportunity to visit my local Chinese supermarket, I had to use Waitrose's own brand noodles.

They took 4 minutes to cook, and I admit I was initially sceptical, but they had enough springiness to work in this dish.

Then it was on to stripping the chicken. I should have done this the night before, and it would have saved me a lot of time. It would also have saved me a lot of space in my fridge. Still, after cooking the Sunday lunch with Him Indoors (he is a whizz at roast dinners) and clearing up the kitchen afterwards, I had had enough, and just wrapped the remaining whole chicken with foil and slung it in the fridge.

The most time consuming part of this dish is cutting all the juliennes of vegetables and fruit. Ching is a dab hand with a cleaver, having seen her on TV, and perhaps she is able to get everything prepped in 10 minutes, but I would say that it is going to take us average joes a lot longer. But looking at the colours in the bowl together, I had the feeling that this was going to be a dish where the effort would be well worth it.

The dressing involves a lot of ingredients, and seems intimidating. However, if you have Chinese or Thai food at home, the chances are you have most of these ingredients knocking around at home. The rice vinegar was something I had in for making potsticker dipping sauce, but it may be something you need to buy in especially. I used to hate the hassle of preparing ginger; peeling with a knife, grating and hoping not to lose my fingertips, but it really adds something to Indian and Chinese food, so I have gotten over my animosity. Sadly, Him Indoors ate the pack of salted peanuts I'd bought for the topping on the Saturday night, so I couldn't top the dish as Ching suggested. However I did have a jar of Chinese fried onions bought on my last trip to See Woo, so they had to do. And there you have the dish:

The verdict: this dish took much longer to prepare that I expected. If you are using leftover cooked chicken, however, you could still manage to have this as a midweek supper, because you would not need 30 minutes cooking time. This is a good 'in at 7, dinner at 8' sort of evening meal. I thought it looked very appetising in the dish. As I said from the outset, the real yardstick of a good recipe is taste, and this has it in bucketloads! The dressing seems overly thick and cloying when you mix it up, but it really works over the light cucumber, peppers and mango. It coats the chicken and noodles, transforming them from bland to flavourful. My only regret is that there wasn't any left over for taking into work the following day! This will be made again, the next time we plan to have roast chicken on a Sunday. Score!

Ching herself has an alternative version to this recipe, her own version of 'Bang Bang Chicken' which she cooked on Market Kitchen and is a little simpler than this recipe: http://uktv.co.uk/food/recipe/aid/611266

Another possible alternative to this recipe, the dressing for which would certainly be lower in calorific value, might be Allegra McEvedy's Bang Bang Chicken, to be found at:

Saturday, 8 October 2011

Mushroom and Chicken Spelt Risotto

This is a dish inspired by the Spelt and Porcini Risotto I had at Skylon Restaurant at the South Bank. A place worth visiting for good food and lovely views across the river. 
I realise the pictures here are a little shaky. I was working in low light and did not want to use the flash, since indoors it always seems to mess up the colours. Apologies. But you can still get the general idea of the dish and how it is made.

Serves 2

Ingredients:

3 chicken thighs, skin on (or use leftover roast chicken)
10g dried porcini
1 shallot/½ small onion, finely chopped
3 garlic cloves, very finely chopped
1 glass vermouth
140g spelt
5 chestnut mushrooms, chopped
750ml stock
4 tablespoons finely grated parmesan cheese
1 tablespoon butter
1-2 tablespoons olive oil

Method:

  1. Preheat the oven to 180°C.

  2. Soak the porcini in half a mug of boiling water for at least half an hour.

  3. Roast the chicken thighs in the oven, at around 180°C for around 25-30 mins, until cooked. Leave to cool, remove skin and break up into small bite sized pieces.

  4. Drain the porcini, try to squeeze out the excess water, and chop finely.

  5. Put on another pan with the hot stock in it, keeping it warm. I put it on a very low heat with the lid on.

  6. Melt the butter in a pan, and add the olive oil and mix together. Now add the onion/shallot and fry for 5 minutes.

  7. Now add the chestnut mushrooms and garlic and fry for another 2 minutes. Stir occasionally to prevent the garlic from burning.

  8. Add the drained porcini and fry for another 5 minutes.

  9. Add the spelt, turn up the heat slightly and toast the grains for around 2 minutes, stirring frequently. This ensures the tough shell of the grain can take in the vermouth and stock you will be adding shortly.

  10. Now add the vermouth, and allow the alcohol to burn off, about 3-5 minutes.

  11. Now comes the adding of the stock and the most labour intensive part of the dish. Add the stock, ladle by ladle, stirring as you go, until the liquid disappears. You will be doing this for a long time as the cooking time for spelt is pretty long and in any even much longer than for risotto rice. Keep going for about 40-45 minutes. Check the spelt is cooked, as you may need to cook a little longer.

  12. Now add the cooked chicken, mix thoroughly and ensure the chicken is heated through. 
     
  13. Serve in bowls topped with the grated parmesan.