Thursday 25 August 2011

Cheating at cooking: Vietnamese Summer Rolls with griddled marinated lamb

You have to feel sorry for Delia Smith. For years she wrote cookbooks full of recipes which always worked. The trouble was, they were often lengthy, had a lot of steps and took quite a while to make. As a result, she sold lots of books to people with the aspiration to cook at home more often, but this was not matched in actuality. In other words, the books languished on the shelf in favour of a microwave dinner or quick call to the take away. So Delia, never being a woman to give up (as her drunken call for Norwich City supporters to get behind their team will attest), decided she needed to change tack.

The resulting 'How to Cheat at Cooking' met with a very hostile response. Some of her time saving ideas did not meet with my approval, such as the use of frozen sliced onions. I am quite capable of slicing onions and it is not such a time consuming job, but the real problem is not all vegetables lend themselves to being frozen. This can be seen when your bag of salad touches the back of a very cold fridge and goes floppy, transparent and totally unusable. Well, same happens with the sliced onions, whose structure just breaks down once frozen and then thawed.

However, some of her innovations were actually very useful for the busy person; for example the revelation that frozen seafood need not be thawed, when all you actually need to do is lengthen the cooking time slightly. Brilliant! How many times have you forgotten to take something out of the freezer to defrost before going to work (my answer: too many times than I'm willing to admit!). And who wants their kitchen smelling a little fishy from the seafood defrosting all day?

Cooking purists seem to despise most, if not all, time saving pre-prepared products. Whilst there are many which I refuse to use, there are some which save time and fuss and taste great.

The pre-prepared ingredient I am using here is a Vietnamese Lemongrass Marinade which I bought from a Chinese grocery shop. It is made by Asian Home Gourmet, whose Far Eastern products are pretty reliable (although experts may question how authentic they are), but whose Indian products I have not tried. Website: http://www.asianhomegourmet.com/. I am all for making your own spice and curry pastes, but some of the ingredients are not always readily available and the process of finely chopping and blending can be very labour intensive.
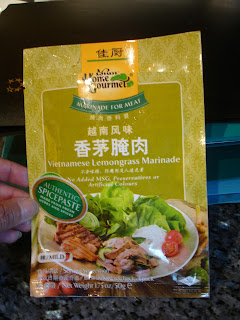
My cheat's ingredient: Lemongrass Marinade
What I wanted to make here are those lovely rice paper rolls which seem to combine salad, noodles, herbs, and meat/seafood in a happy marriage of fresh and zingy flavours which only the Vietnamese can pull off. This is a healthy and light supper for 2 or starter for perhaps 3-4.
Banh Trang rice paper circles, available from Chinese and Vietnamese grocers
Serve these Summer Rolls with Nuoc Cham dipping sauce. (See http://snigskitchen.blogspot.com/2011/08/how-to-make-nuoc-cham-vietnamese.html for recipe).

Ingredients:

6-8 Banh Trang rice paper circles (I made 6 rolls, but depending on how much you put of the filling ingredients in each, you could have up to 8)
3 spring onions
6 asparagus spears, halved vertically (optional)
¼ cucumber
1 small carrot
1 small handful whole mint leaves, washed and dried
1 small handful whole coriander leaves, washed and dried
100g pho rice noodles (medium thickness rice noodles)
dash of groundnut oil (about half a tablespoon)
2 lamb steaks
1 packet Vietnamese Lemongrass Marinade

Optional: 1 small handful beansprouts

Method:

  1. Marinate the lamb steaks in the Lemongrass marinade mixture in a non-metallic bowl for at least 1 hour at room temperature (or for anything between 6 and 12 hours in the fridge).
  2. Whilst the marinating is taking place, prepare the other ingredients.
  3. Cook the pho noodles in boiling water, which should take about 6 minutes. If you don't want to put another pan on and can manage to keep them separate, cook the asparagus in the same pan – the cooking time is 4 minutes.
  4. Drain the pho noodles and cool in running cold water. Dress with the groundnut oil. This will stop the noodles sticking together. Put in a bowl and chill in the fridge. 20-30 mins should be ample.
  5. After taking about 3-4 fine slices of 1-2mm thickness of the carrot, either grate or slice the remaining carrot into julienne strips.
  6. Slice the spring onions in half lengthwise once you have removed the roots and ragged tops (leave the green parts which are firm and unspoilt, they are tasty). Slice up into quarters lengthwise.
  7. Partially (or completely depending on your taste) peel the cucumber. Cut into batons.
  8. Put all the veg and herbs onto plates in little sections to assist you with the assembly of the rolls.
  9. Now cook the lamb. This was done on a hot griddle pan for 3 mins each side. However, if you decide to use the grill, the time may depend on how hot it is.
    Cooking the lamb; I would say you don't want it overcooked, but pink in the middle.
  10. Once the lamb is cooked, leave to rest for a few minutes, then slice up very finely.
    All the ingredients ready for assembly of the rolls.
     
  11. Find a nice shallow bowl or dish big enough for the Banh Trang papers. These need to be soaked in water to soften them before you can use them to wrap up the Summer Rolls.
  12. Now you are ready to assemble the rolls. Do them one at a time with one plate for the rolling and another for serving.
  13. Put one of the rice paper circles into the water. Submerge it and take out fairly quickly. You don't need to soak them. Transfer to your rolling dish.
    Dunking a Banh Trang circle for softening

    Lifting the rice paper circle out - watch out, they are fragile!
  14. Whilst you work, you will find the rice paper softens, so don't worry if it is still a little hard. Place a small amount of noodles along the centre of a rice paper circle. Then place a few slices of lamb and spring onion along the centre.
    Assembling the rolls, bit by bit.....
  15. Now add whatever your taste prefers in terms of the carrot juliennes, asparagus  and herbs.
    Continuing the construction.....

  16. When you are done, roll up. Press the seams firmly as the starch in the rice paper circles will stick the rolls together to an extent.

    The finished article.... apart from the 6th roll which didn't fit on the plate!
  17. Enjoy with some dipping sauce. 


How to make Nuoc Cham Vietnamese dipping sauce

“Nước chấm” is a Vietnamese dipping sauce which is very versatile and can be served with Spring rolls, Summer rolls (the uncooked rice paper rolls; for recipe see: ), Vietnamese pancakes and rice vermicelli noodle dishes. It is, like all great South-East Asian food, a combination of sweet, sour, bitter and salty. There are a number of variations which can be made, like the addition of any of the following ingredients: raw grated garlic, vinegar, coconut water, fresh lemongrass slices, chopped nuts, finely chopped spring onions, fried garlic, ginger, or fresh herbs (coriander, sweet basil, and mint). The ingredients you would add will depend on what you are serving the sauce with.

This is a very basic Nuoc Cham recipe. There are other more complex versions available on the internet, but this will get you started. It will go with any of the dishes mentioned above, so you don't need to worry about any clash of flavours.

This sauce will go well with the Summer Roll recipe posted previously: http://snigskitchen.blogspot.com/2011/08/cheating-at-cooking-vietnamese-summer.html

Ingredients:

Makes a decent bowl full. You shouldn't need more than this even for a party of 4 dipping Summer rolls.

Juice of 1 lime
2 tbsp fish sauce
2 tbsp caster sugar
2 tbsp water (authentically there should be double this amount, but it works for me)

1 very finely chopped red chilli (I used Thai birds eye chillis, but these may be too hot for you, in which case use something milder or leave out altogether)
A sprinkling of very finely diced carrot (1mm-2mm cubes)

Method:

I would advise that you use an old (clean) jam jar for mixing the sauce up. It is the easiest method by far for combining these ingredients. This is a very useful trick I picked up from Jamie Oliver's Ministry of Food campaign for mixing up vinaigrette. It is much easier and convenient than trying to whisk up salad dressing in a bowl. Besides, if you don't use it all, you have a handy container to store the excess in until the next day when you can use it up.

Put all the ingredients into the jam jar except the water. Shake thoroughly until all the sugar has dissolved.

Now add the water a tablespoon at a time. Shake. Taste. When the sauce is to your taste (since you may prefer it with the full 4 tablespoons of water required for an authentic mix), then pour out into a suitable bowl for serving.

Wednesday 24 August 2011

Pasta Carbonara: Quickest, easiest dinner EVER!

I love cooking and eating. Sometimes I find that it is a wonderfully de-stressing experience to do some simple work in the kitchen at the end of the day. For example, it is like a form of meditation to stir a risotto whilst adding the stock, ladle by ladle, as the annoyances of work or the daily commute drain away (for recipe see http://snigskitchen.blogspot.com/2011/06/butternut-squash-risotto.html). Even better when you put some relaxing music on to help you on your way to culinary enlightenment.

However, there are days when you are too tired, or you got home too late. On those days, stews which take 2 hours, or curries which take 90 mins, or even a risotto at a humbler 45 mins involve too much work. It is on these days that you either need something nice in the freezer you prepared earlier (which involves a level of planning and military organisation that I am unable to achieve) or you need something you can rustle up QUICK.

This is a pasta recipe which is tasty, inexpensive and fast. You probably will have many of the ingredients in your kitchen anyway (most of us have a packet of pasta and some frozen peas at the very least), but you can easily pick up these ingredients on your way home from work from the vast majority of supermarkets. It will taste far better than any crappy prick-and-ping microwave meal you could buy and will be ready and on the table faster than the time in which your local takeaway can manage to deliver to you.

The classic carbonara is made with spaghetti, although there are versions with tagliatelle. Try them if you wish. I am making mine with a small pasta shape and recommend farfalle or radiattore as they will capture the creamy, eggy, cheesy sauce beautifully. Also, on the days I eat this dish (usually when I have got home very late after a long day at work), I don't want the fuss of chasing long pasta around my plate with fork and spoon. Or the fuss of trying to eat it politely!

Ingredients:

Serves 2

1 egg
175g pasta (don't bother with spaghetti, use a small shape like farfalle)
60-85g packet cubetti di pancetta
½ mug frozen peas (around 80g)
75ml double cream (can vary up to 100ml depending on how loose a sauce you want)
5 tbsp grated parmesan cheese (around 30g)
Optional topping: 25g torn parma ham
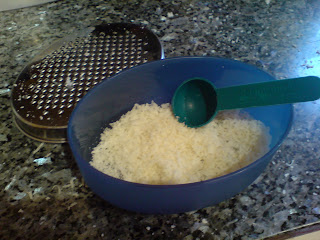
Grate the parmesan finely


Method:


1. Fill a medium sized saucepan with water and bring to the boil. I do not add either salt or oil to my pasta cooking water, but you can if you wish.
2. Meanwhile, heat a frying pan over a medium-high heat, add the pancetta and dry fry until it goes ever so slightly crispy. Put on a plate covered in kitchen roll to absorb any extra fat. Leave to cool.
3. Check the cooking time for your pasta on the packet. This is likely to be 8-10 minutes, although some of the thicker pastas can be 12-13 minutes. Cook the pasta according to the instructions.
4. Please use a kitchen timer to be sure about the timings. There is nothing worse than overcooked, soggy pasta. Add your pasta. You are aiming to cook it until al dente. Set your timer to one minute less than the al dente cooking time.
5. Whilst the pasta is cooking, break the egg into a jug and beat lightly for 30 seconds (until mixed up). Add the cream and beat further. Season with salt and freshly ground black pepper (as doing it now will save precious time later).
 
Mixing up the cream and egg sauce

6. When your timer goes off, add the peas for the final minute of cooking time. Reset your timer for 1 minute and restart it.
7. When cooked drain your pasta, saving half a mug of the cooking water in case you need it later. Turn off the hob. You will now need to work fast.
8. Return the pasta into its saucepan immediately, since you will now use the heat from the pan and the cooked pasta to partially cook the sauce. Add the egg and cream mixture. Mix quickly and thoroughly. If the mix is too thick for your taste, add the reserved cooking water little by little and mix until you get a creamy consistency.
Combine the ingredients working as fast as you can
9. Now add the parmesan, reserving a little for topping. Mix quickly.
10. Serve in pasta bowls, sprinkle the parma ham topping (if using). Then top with the leftover parmesan. Eat straight away; this will cool down quickly.
Almost ready....

All finished and ready to eat in under 20 minutes!

Alternative versions:
  • You could use pecorino cheese instead of parmesan.
  • You could use smoked bacon if you can't find pancetta.
  • You should fry some garlic with the pancetta, provided you do not allow the garlic to brown. It will only need 4-5 minutes cooking time.
  • You could sprinkle chopped flat leaf parsley over the top just before serving. About 1 tablespoon will be more than enough for 2.
  • You might like to serve this with a lightly dressed rocket salad.


Saturday 13 August 2011

TV review: Rick Stein's Spain, Episode 4 of 4

This was the fourth and final episode of Rick Stein's travel-and-food-alogue of Spain. The food of Spain is often neglected in the attention it receives. It is never seen as matching the quality and refinement of French or Italian cuisine. Stein wanted very much to redress the balance with this series. I agree that Spanish food deserves much more recognition.

In my view, cooking and preparation techniques do not have to complex to result in good food. Some of the world's best dishes are simple. So why is the food of Spain not respected more? And, let's be honest, some Spanish dishes (most notably Paella) appear to be very simple but are actually quite difficult to get right! Believe me, after picking up a Paella pan (small size for 2) during my travels in Andalucia, and thinking it would be a doddle, it really is more tricky than the recipe books make out! I realise that Ferran Adria with his 3 Michelin Stars has proved that Spanish food can be sophisticated and on a par with the finest food anywhere in the world, but El Bulli was always far from the typical, and given that it is closed for good now, none of us mere mortals will get the chance to sample its fare.

During his series, Rick has travelled to Galicia, the Basque region, Catalunya, La Mancha, Extremadura and ending in Seville. The scenery has been stunning, the people he has met fascinating, and frankly, had me wanting to book a flight and retrace many of his steps, both in terms of travel and culinary discovery. In my mind, that has to be the measure of a travel and food show since the high-watermark was set by the late, great Keith Floyd. I would also praise this programme since it has been relatively gimmick free, too. Stein travels, interviews, watches others cook and attempts dishes without self-aggrandisement or artifice.

In this last programme, he toured the relatively unknown central Spanish region of Extremadura and ended his trip in Seville. As he pointed out, the name 'Extremadura' is not derived from an expression of extreme toughness of the terrain (as in “well 'ard!”), but because the region is at the extreme of the Douro river. I've never been to this particular part of Spain, but his enthusiastic presentation of it makes clear to me that this is yet another gap in my travel CV.

Other commentators appear to describe Stein as 'avuncular' (or even 'super-avuncular') and it seems to me to be somewhat patronising and more than a little bit ageist. He has travelled to Spain since he was a youth, and when you have done so and reach the age of 64, will have noticed changes in society, places etc. You are bound to comment on them, right? I am a long way from collecting my free bus pass and can notice how my home town has changed in the time I've been here. Does commenting on it make me an old Auntie? (Please don't answer yes to that question! I'm already having a mid-life crisis!)

What is to be admired is that after all these years and so many different series, Stein can still demonstrate sincere and real enthusiasm for food, cooking and imparting that passion to viewers. He doesn't go through the motions, or fake his enthusiasm for learning new techniques or discovering new ingredients or even imparting his knowledge of well known ingredients. His journey to the farms which grow Pimenton (that's Spanish paprika to the uninitiated) was a case in point. If you want to find some wonderful smoked paprika, I'd advise you head to the Brindisa shop in Borough Market, which is also a haven for all things Spanish. Round the corner is their lovely tapas bar where you can rest and enjoy a glass of wine and a nibble to get over your journey south of the river to London Bridge.

The recipes featured on this programme are generally authentic (he lets you know when he has done his own take on a classic) and are more importantly, achievable. None of the techniques are difficult (although some dishes are time consuming). None of the ingredients are impossible to get hold of or are unduly expensive. Having watched so many other cooking shows and then had the inevitable wild goose chase for “essence of unicorn” or “angel tears” or some other such nonsense, I was pleased that everything was available without a mission.

Although I have not yet made the leap to buying the book (my kitchen shelf is heaving already and I have to clear some of my beloved cookbooks out before I buy ANY more), it would appear that the book to accompany the series is accessible, helpful and easy to follow. I am tempted! For a review, have a look at this:

I'll close with the words of the man himself, which I think sums up Spanish food and cookery:
"To me the underlying point of journeying to Spain would be to discover the ‘duende' in the cooking.  By that I mean a sense of soul, of authenticity. The word is normally used for the soul of flamenco but I think it could be equally applied to the art of Spanish cooking because to my mind, in really good food, there is a communication between the cook and diner that amounts to art."

Thursday 4 August 2011

Snigdha's Marrakech Lamb Stew

Sadly, my travel CV does not include Morocco. This is an omission which, if time and money will allow, I hope to rectify. That doesn't have to stop me enjoying the flavours of this fascinating country whose food is influenced by a wide range of cultures; Arabic, Berber, Moorish and of course, its neighbours around the Mediterranean. Moroccan food is more spicy than that of either the Mediterrean nations or the middle-east. Perhaps this is why it appeals to many in the UK, who have welcomed spicy food onto their tables and into their hearts.

Lamb is the favourite meat of the Moroccans, and given their talent for either marinading it or slow cooking it, I can see why. However, beef is the most frequently eaten meat owing to its lower cost. Most of us are familiar with the 'tagine'; a stew consisting of meat often cooked with fruits such as dried apricot, raisin or preserved lemons. What some may not know is that 'tagine', much like the word 'paella' in Spain, refers to the cooking dish rather than the food itself. A tagine is the two part cooking utensil consisting of a large circular base with a high lip where the food is placed and a conical lid with a hole in the top which acts like a chimney. The tagine is put on a stand over a small wood fire. Here in Europe, you can buy cast iron tagine pots (Le Creuset make a particularly attractive but somewhat costly one) which can go straight on the hob. If you go to Morocco and buy a traditional tagine, you cannot put it directly on the hob or the terracotta will crack and send your stew all over the place! You will need heat diffuser to go underneath it.

I don't own a tagine, my kitchen is only a medium sized one and is full of a huge amount of kitchen paraphernalia as it is. Given that Him Indoors and I cook regularly, the kitchen is heaving with utensils, gadgets and foodstuffs. I just can't keep it tidy, although it is always clean. So this stew has been cooked in a casserole dish. I don't think it suffers as a result, but would be interested to know if anyone has tried using a tagine as well as a casserole and whether there is any difference in flavour.

(serves 2)

Ingredients:
4 small onions, chopped
4-5 cloves garlic, finely chopped
2 bay leaves
2 small sticks of cinnamon
½ tsp cumin seeds
½ tsp paprika
1 x 400g tin chickpeas, drained and rinsed
1 x 400g tin tomatoes, chopped
2 lamb shanks
1 aubergine, cut into half moon slices
1 tbsp tomato puree
1 teaspoon harissa
a little flour – for coating the lamb shanks
a little water – to loosen the stew if getting too thick
Salt
Ground black pepper
Some olive oil


Method:
  1. Preheat your oven. You will need a temperature of 195°C for conventional oven or 175°C for a fan oven. This dish is best cooked in a flameproof casserole type dish like a cast iron casserole dish.
  2. Firstly, heat some olive oil (about 2 tbsp) in the dish. As this is happening, lightly coat the lamb shanks in flour and when the oil is hot, add them in. When they are browned all over, remove them to a plate.


  3. Add more olive oil and start frying the aubergine until browned. This is best done when the pan is good and hot, so that the aubergine doesn't soak up lots of oil when cooking. Cook in small batches so the pan doesn't cool down or get too congested. Place with the browned lamb when done.


  4. Add a little more olive oil (this is not diet food, I'm afraid!) and fry the onions for about 6 minutes. Add the garlic and cinnamon and cook for another 4 minutes. Then add the puree and harissa, stir thoroughly to mix and cook for 3 minutes to cook the flavours out.


  5. Add the tinned tomatoes, chick peas, salt and pepper (to taste) and some water if needed. You want the lamb completely covered by the stew so that it stews and doesn't roast instead. Turn the heat up and bring to the boil. 

     
  6. Once you have done all of this, your work is almost done. Pop the casserole dish in the oven and put your feet up. The stew will be done in 1½-2 hours depending on your oven, size of dish, amount of fluid, etc. The stew will be ready when the lamb is so tender is practically falling off the bone. If that means putting it back in the oven for an extra 20-40 minutes, go ahead.


  7. Serve with crusty bread, although couscous or rice will probably go well with the juicy sauce.