Wednesday 29 June 2011

Recipe Road Test: Atul Kochhar's Parsi Lamb Curry

As a child I was very lucky to have my mum's wonderful food. All Indian, with strong Bengali regional influences, my mum always cooked 'by feel' with no written recipe, no scales, no measuring spoons, just her instinctive knowledge of what would work right. Sadly, I didn't receive her special gift, even after trying to watch her many times in the kitchen. However, what I did receive was a taste for really good Indian food which in adult life has ended up being both a blessing and a curse. The sad part is that I find it very difficult to enjoy typical 'curry house' fare. Many of our typical high-street Tandoori restaurants make curries up out of large industrial jars of ready made sauce, leading to consistent results, but a terrible compromise on flavour. In my book, curry only works through the alchemy of cooking all the ingredients together, hence adding cubed meat to a ready made sauce is such an anathema to me.

Now, as I said earlier, I didn't obtain my mum's ability to cook by feel. This means I have to turn to the cook books. There are many excellent writers on the subject of Indian food; Mridula Baljekar, Anjum Anand, Vicky Bhogal, Reza Mohammed, Cyrus Todiwalla and the lady who started it all, Madhur Jaffrey. However, the man who is at the top of British Indian gastronomy currently is Atul Kochhar. Atul's “Benares” restaurant has shown that Indian food can fit the fine dining experience, being on of the very few Michelin starred restaurants serving Indian food in the UK. If you eat there, you will find real innovations based on the flavours, textures and cooking methods used in Indian food. Atul is pushing the boundaries, and achieving real success in doing so.

However, it isn't all about invention. If you want to be an artist, you start by learning the basic skills, then you copy from the great masters to refine your technique before developing your own style. Even the great Picasso studied and copied the works of the greats such as Velasquez. In Atul Kochhar's book “Simple Indian: The Fresh Tastes of India's New Cuisine”, Kochhar shows how he knows and understands completely the nuances and subtle differences between India's regional cuisines. In this book he shows his knowledge of the great dishes of India and his mastery over them, which allows him to experiment so successfully.

When it comes to Indian cooking, I am still serving my apprenticeship. So I attempted to make Kocchar's Parsi Lamb Curry with Straw Potatoes (Salli Ma Kharu Gosht) from Simple Indian (above). It turned out to be a wonderfully authentic north west Indian dish.
The recipe, taken from “Simple Indian: The Fresh Tastes of India's New Cuisine” by Atul Kochhar
First you must start by preparing the base of the curry sauce: onions, garlic & ginger paste, salt, chili powder, cumin, turmeric, cinnamon, dried red chili, cloves and green cardamom.
Curry sauce base: the usual suspects
Then you ensure you have your lamb in cubes, optional fresh chopped tomatoes (which I would recommend to be added to the dish as they lend the gravy flavour, colour and substance), and the deseeded green chilies, sliced in half.
Cubed boneless lamb (can use leg, which is preferred, or shoulder), fresh tomatoes and chilies
Once the ingredients have been prepared, you can then start cooking. This means you can pay proper attention to what you are doing. I can't chop tomatoes whilst trying to keep an eye on something else frying. If you can multi-task like that, go ahead!
Start by frying the whole spices in groundnut oil; dried chili, cloves, green cardamom and cinnamon.

Then add in the onions.
For a curry sauce with deep flavour, you need to fry the onions for a good 10 minutes. They need to start going brown at the edges. This isn't really done in European food, but that slight caramelisation (and slight burning) will impart flavour into the finished dish.

Once this has been achieved, a small amount of water and some ginger and garlic paste is added. They are added at this stage because they don't need as much cooking as the onions do, and you don't want them burning or they will spoil the dish. I don't keep ginger and garlic paste, so I simply grated the ginger and garlic freshly. If you cook curry often, it is an idea to make a very big lot of ginger and garlic paste in the food processor, freeze it into cubes (or tablespoon portions) so you are good to go whenever you want to cook up a curry.
After stirring for 2 minutes the ground spices; turmeric, salt, cumin and chili powder are added. Cook these out for a minute or so.


You will see from the picture above that the turmeric and spices have blended in with the sauce base ingredients and there is quite a bit of steam. This will lead to the curry sauce having a mellow and smooth spicy flavour.


The next step is adding the lamb and chopped tomatoes:

I found I had to stir the ingredients quite frequently to make sure the tomatoes were fully heated through and were starting to break down and to ensure the lamb was browned all over.
Adding the water for the gravy to form
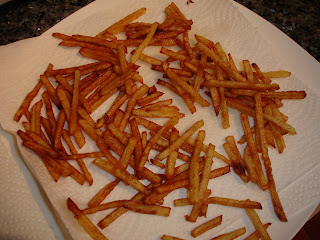
I then started on the straw potato topping. This involved cutting up 2 small potatoes into chips a little thicker than matchsticks but not as thick as French fries. The potatoes were typical Summer type potatoes; a little waxy, so I was sceptical about how well they would fry and so took the decision to double-fry them. The first frying happened just after I added the water to the curry and left it to cook for 40 minutes and the second frying was just before it was time to serve up.

Allowing the excess oil to drain off:

Meanwhile the curry was cooking away.....
Becoming close to fully cooked....
Second frying of the straw potatoes:


And voila - Parsi Lamb Curry with straw potatoes! (I couldn't resist making up some dahl to have with it, though!)

This was an easy to follow recipe with nothing to throw the cook off track. If everything is prepared in advance, all you have to do is follow the simple cooking instructions. Atul Kochhar's description of the method is direct and to the point. Whilst the straw potatoes added a new texture and some pizzazz to the look of the dish, strictly speaking, this would have been a very tasty lamb curry without them. The deseeded chili sliced lengthways brought a heat to the dish which was not overdone and allowed the flavour of the lamb and North Indian spicing to shine. This was a very nice curry that I will be making again.


Wednesday 22 June 2011

How to make delicious onion bhajis

I've seen many recipes for onion bhajis in my time, and I have eaten many takes on the iconic Indian fried dish. Some were just plain wonderful, others just plain or just plain awful! I've had efforts which were oil-soaked, cardiac-arrest inducing fat fests, or soggy, overly battered damp-squibs. All decent bhaji recipes should use gram flour – the creamy yellow flour gained from milling chick peas. Anything else will smack of a lack of authenticity! I've even seen recipes involving eggy batter – unthinkable in Indian cooking; eggs are much too valuable a commodity to be used for batter alone when simple judicious batter recipes will bind themselves to their intended target.

After much reading, experimenting and some obligatory mess-ups, I think I have gotten there. This is my recipe. Any suggestions for improvement will be welcomed.

You could deep fry these bhajis, but it will make a fattier, less healthy result and you will only be able to re-use the oil for a similarly spicy or oniony dish. I think it's outrageous to use lots of oil only once to throw it all away. I saw a recipe for these bhajis once which used over a litre of oil – what a terrible waste! In these days of rising food prices and the fact so many are starving, wasting food of any descriptions seems to me to be crime. So shallow fry and be content that you are making them in an authentic way with minimum waste and maximum taste. Serve with your favourite Indian food as you wish, but my recommendation is with dahl and rice (basmati, of course!).

Ingredients:

1 large red onion (will give a sweeter result than white onions)
1 tsp of finely grated/mashed ginger
1 green chili (optional)
½ tsp whole coriander seeds
½ tsp whole black mustard seeds
½ tsp whole ajwan/nigella seeds
½ tsp salt
35g or thereabouts gram flour (chick pea flour/besan)
2-3 tbsp groundnut oil

  1. Top, tail and peel the onion, cut in half vertically, then cut into fairly fine half moon slices (about 4 mm thick).
  2. Toast the seeds in a dry pan until you can smell their spiciness (only about 3 mins). Do not allow to burn. 

    Transfer to mortar and pestle and crush into a spice mix.

  3. Mix chopped onion with the salt, spice mix and ginger into a bowl (not a metal one, please). Leave for at least 5 mins. Stir a couple of times to allow the onion to marinate.

  4. Add the chick pea flour slowly, mixing as you go. I have given a rough amount, but what you are looking for is only enough of the flour to bring the mixture together.

  5. Heat the groundnut oil in a pan until hot. The oil must be hot to prevent the bhajis from becoming too greasy. Don't go to all this effort to make oily, greasy bhajis!
  6. Form the bhajis into round patties, fry until brown. Serve immediately.


Tuesday 21 June 2011

How to make your own Panch Phoran

I recently posted my take on the classic Indian dish tarka dahl.
My 'tarka' (the fried onion and spice mix which is stirred into the dahl at the end), was made from Bengali Panch Phoran. However, it is not as readily available as I had thought. Not all Indian grocery shops stock it.

You can find ready made Panch Phoran online:

For those of you who don't want to spend ages hunting around for the stuff or can't be doing with buying spices online (you need to buy £30 before you get free delivery, which is an awful lot of spice!), here is how to make your own. Don't buy those teeny tiny jars of spices from the supermarket, they won't last very long. If you buy the packets from the ethnic grocery shops, you'll find they are much better value and you'll have some left for other dishes. The spices used here will be useful for a variety of other dishes, particularly the cumin and fennel which will be useful for Indian and middle-eastern dishes.

You will need equal measures (say 1 or 2 tablespoons) each of:

Nigella seeds (khalo jeera)
Fenugreek seeds
Cumin seeds (jeera)
Fennel seeds (saunf)
Black mustard seeds

Variation: substitute the black mustard or fennel for Radhuni seeds (if you can find them!)

Keep all the seeds whole. There is no need to toast them in advance, since when you cook with them, most recipes will call for the seeds to be fried before the addition of other ingredients.

Combine all of the seeds and store in an airtight container. A jar will do nicely. However, if you have metal spice containers, that would be best since prolonged exposure to light will spoil the spices.


Here are some other sites with recipes for using your newly made Panch Phoran:

4 recipes: Potatoes with tamarind, Spinach, Salmon and Pan roasted potatoes (all flavoured with Panch Phoran):

Nigella's Panchiporan Aloo (potatoes with Panch Phoran):

Gordon Ramsay's sweet potatoes with Panch Phoran:


Monday 20 June 2011

Taste of London 2011

I went to the very first Taste of London festival. Back then, the event was held in the far smaller environs of Somerset House, which lent grandeur and a lovely background, but insufficient space. Since then it has moved, and grown immensely. A large section of Regent's Park was given over to what Michel Roux Jr describes as 'food heaven'. This year 44 restaurants participated, along with many bars. Some are real heavyweights in the food world; Roux himself was represented by Le Gavroche and Roux at the Landau, also present were Gauthier, Petrus, Scott's and many more. It wasn't all about the top restaurants, though. Many smaller, up and coming and non-European restaurants participated.

My husband (aka Him Indoors) and I visited the festival on its final day. We bought our tickets on the 'premium' deal, costing £38 each with £20 in “crowns” (the currency for the festival) included. This seemed a much better deal than the £22 standard entry with seemingly no crowns at all (which went up to £26 each on the door). The online tickets we printed off in advance got us into the festival with a minimum of fuss, and we realised when we saw the queue for the on-the-door tickets, had saved us a lot of time!

Regent's Park was decidedly wet under foot on Sunday after all the rain we've been having in London. As a result, wellies really were the order of the day! Some areas of the site got a little boggy, reminding everyone that Glastonbury is on its way. We had a couple of showers during the course of the afternoon, but everyone was in the mood to make the best of it. People huddled together until the showers passed, before moving on to the next delight.
Snigdha at the Pink Fork; a true Taste landmark!
The organisers have done a great job of ensuring punters can get the most out of their day. The festival booklet included a map of the site, timetables for the cookery demonstrations, book signings and wine tastings. Most helpful of all, however, was the menu card; a full list of all the dishes on offer, with their cost in crowns. Much easier than wandering around trying to read the menu boards, particularly at some of the busier restaurant stalls.

Having recently seen the pictures of the RMT union boss Bob Crow dining at Scott's, we decided to check them out. Prohibitively expensive for a real sit down lunch for me and Him Indoors, we figured this was a great opportunity to see what all the fuss was about. After all, we thought, if it is good enough for Mr Crow, it is good enough for us! I had the octopus carpaccio, Him Indoors the shrimp and scallop burger. Both were delicious. The burger was cooked to perfection with a soft, yielding texture. The carpaccio with slow roasted tomatoes was seafood heaven on a little wooden dish.

That small treat started us off on a day of great discoveries....

ORA's take on contemporary Thai cuisine was a disappointment to me. Their Grilled tuna dish (Pla Tuna Song Kreung) was overcooked despite being served cold. If served freshly cooked from a mobile kitchen, a little overcooking could be overlooked, but was unforgivable for something pre-prepared. A terrible shame given the lovely flavours of lemongrass, tamarind and fresh herbs it was served with.

One memorable treat was Richard Corrigan's lovely traditional fish and chips. Corrigan's Mayfair did us proud with wonderful double (or was it triple?) cooked chips, fluffily battered highly fresh fish and a homemade tartare sauce which brought the dish together perfectly. Possibly even better than the fish and chips I had at Rick Stein's Padstow chippy, and with less of a journey to get there!
Delectable fish and chips by none other than Richard Corrigan
Snigdha gets to meet the man himself; Richard Corrigan

Kai Mayfair's pan-asian contemporary cuisine was good, if not brilliant. Their barbequed soy and honey marinated lamb was cooked just right, with appealing flavours. Maybe I am being a little hard on it, but I can't get over my disappointment that the 5 hour cooked belly of pork sold out!


Thanks to the Executive Chef of the Ritz, who let me try truffle for the first time. I can see now why it is used so sparingly in food. Not due to its price, but its intense nuttiness.
Guess the price of this truffle; answers on a postcard!

Indian food was well represented by Tamarind, the Cinnamon Club, Cafe Spice Namaste and of course, the wonderful Benares. Benares is perhaps the most interesting of all of them; a place where Indian food is being given the fine dining feel and elevated to an art form. No-one is doing the sub-continent's food greater justice than Atul Kochhar, so you would hardly believe my surprise when I bought my Grilled fennel infused lamb chop with mint chutney, for the man himself to come out to serve us all!
Snigdha meets the amazing Atul Kochhar

This is, to my mind, one of the real indicators of how important an event in the foodie's year that Taste of London has become. Many top chefs and 'celebrity' chefs had set up temporary restaurants at Taste, and even though their reputations would have sold the food by itself, several made the effort of visiting and meeting the public. Taste of London is a great way to familiarise yourself with the styles and food of restaurants you might not want to take the chance on for a full meal and for the restauranteurs, it is an opportunity to build a customer (and fan) base.
Snigdha meets Pearl's Jun Tanaka, promoting new project Street Kitchen

We participated in 2 wine tastings. The first was Waitrose's selection of “Barbeque Treats”; a selection picked with suitability for Summer Barbeques in mind. Fingers crossed we will get the weather to try this out for real! They were a mixed bunch, a Le Paradis 2009 Chinon and Brown Brothers Moscato Rosa 2009 which were an uninspiring mild red and syrupy 'party juice' respectively. The Waitrose Reserve Shiraz St Hallett 2009 had a strong deep taste with heavy tannins; a candidate for beef bourginon, methinks (you serve it with the wine you cooked it in). The Rabbit Row Sauvignon Blanc 2010 was an interesting discovery; made by the same producer as Vina Maria, this was a smooth and drinkable Marlborough Sauv Blanc. Definitely one for the trolley! Despite its inclusion as a BBQ wine, the Domane Wachau Gruner Veltliner “Terraces” seemed to us to be an unoaked wine which would go unusually well with spicy food. Matching wine with Indian and Thai foods is often difficult, but this off dry wine was smooth with fruity aromas. One for my next curry cook-off!

The second tasting was a specialist tasting for Italian dessert wines. It was organised by Grossi Wines, a specialist importer who only buy from small producers and insist on high standards in production such as no mechanised harvesting. Our guide to the wines was the lovely, highly knowledgeable and deeply enthusisastic Gemma.
Gemma from Grossi Wines, with Snigdha

We tried a 2005 Michi Vin Santo, a rich wine with warm raisin tones and hints of burnt sugar, a 2007 Silver Medal winning Verlit (our favourite) made by Marco Checchine, a Mazzi 2005 Le Calcarole (reciato della Valpolicella Classico) full of blackcurrants and jam and finally a Pometti, the 'wild card' of the bunch; a liquer of 20% strength made from wine blended with pomegranate juice before being fortified. I could almost feel myself transported to a hillside Italian restaurant dipping crunchy biscuits like cantucci into my glass having consumed a delicious meal beforehand! And all included in the price of the ticket!
Can you tell which was our favourite?

All of which brings me back to the issue of cost. One crown costs 50p, with the majority of exhibitors not taking any cash payment whatsoever. Generally the dishes were 8, 10 or 12 crowns, unless you were going for something particularly grand, such as Skylon's lobster at 20 crowns or Gary Rhodes' Jaffa Cake Pudding at an amazing 30 crowns! Some have complained about the overall cost of the Taste of London event. I wouldn't say it is a cheap day out. On top of our £76 ticket costs, we clocked up another £20 in crowns, making it almost a hundred pound day out. However, we had some amazing food from restaurants we can only dream of eating in (Scott's needs to be booked at least 2 months in advance). We also were able to mix and match between dishes made by some of the UK's finest chefs, which you can't do anywhere else. And given the amount we had to imbibe, we certainly got our money's worth. By all means, grumble about the cost, but a meal for 2 in London would easily cost £100. We will be back next year, for sure!

Wednesday 15 June 2011

How to make dahl

(Originally posted on facebook by Snigdha Nag on Wednesday, 30 June 2010 at 19:41, rewritten June 2011, with pictures).

Call them 'roots' or 'genes' or whatever, but now and then I get a compelling urge for the taste of wonderful Indian food. Only now is it being recognised that the turmeric, cumin and chilli used in Indian food are actually GOOD for you. Yes, gastronauts; the turmeric is a powerful anti inflammatory and is now thought to prevent bowel cancer; the cumin has a anti bacterial effect and chillies are loaded with antioxidants (more than oranges gramme for gramme!). So now is the time to say: I'm eating Indian and it's part of my health regime!

So, the dahl recipe I will share with you is as a result of many years of experimentation. It is a basic dahl with a tarka thrown in at the end. Yes, all those years you've been wondering what exactly 'tarka dahl' is, and now you've discovered the answer: it is simply lentils with hot fried spices stirred in at the end. You can add the tarka to any type of lentils you use, making it a tarka dahl.

There are many other dahl recipes. Some good, some bad. There are two secrets to this recipe. The first is that I use chana dahl, split black chickpeas without the skin, for its unique flavour and excellent texture when cooked. The second is that because it is cooked for well over 1 hour, the lentils slow cook, absorbing water slowly, causing them to swell and soften in a gradual manner. I find that other recipes which call for only 40 odd minutes of cooking don't achieve the same comforting texture.

For a very interesting article on the different ways of achieving perfect dahl (if not the perfect spelling of the word!), have a look at:

Serves 3 as a main meal with rice or 4-6 as a side dish with rice and curry.

For the dahl:
250g chana dahl (now even available in Tescos!!)
1 litre water
2 peeled slices of ginger of about 7-10mm thick
3 bay leaves
1 tsp turmeric

For the tarka:
3 cloves garlic, peeled and chopped into fine dice (about 1.5-2mm)
1 onion, halved and then sliced finely
1 and a half tsp 'Panch Phoran' (a Bengali spice blend available in Indian grocers, but if you can't be bothered, equally good is half a tsp of cumin and half a tsp of black mustard seeds)
A slurp of groundnut (peanut) oil

1. Put dahl and water in a saucepan (make sure it has a lid). Put on high heat on the hob. Bring to boil and boil for about 5 mins. Get rid of the horrible foamy scum as best as you can and then turn down heat to a simmer.
2. Add the ginger, bay leaves and turmeric. Stir thoroughly to mix up.
3. Put on a very low simmer. Place lid so that most of the pan is covered, but leave a small gap for the steam to get out, about half to 1 cm.
4. By about 40 mins the dahl should be getting tender. Take the lid off completely.
5. At about 1hr to 1hr 15mins the dahl will have lost a lot of water and should be thickening nicely. Now is the time to make the tarka.
6. Heat the oil in a frying pan. When hot add Panch Phoran and keep stirring. 
7. After about 1 minute, add the onion, and fry, stirring occasionally for 4 minutes.
8. Add the garlic. Fry for another 4-5 mins, keeping stirring the mix. When the onions have started to brown, you are ready for the final step. 
9. Now chuck the whole tarka into the saucepan of dahl. Mix up thoroughly. Serve.

Optional final step: add a handful of chopped coriander leaves for extra yummy flavour!

Tuesday 14 June 2011

How to make butternut squash, butter bean and pancetta/bacon soup

Continuing with my current theme of things to do with a butternut squash, I thought it was time to revive my old recipe for soup. This soup is obviously more of a Winter dish. However, let's be honest, some days last week I've been wondering what season we have really been in what with the cold and heavy rain. Anyway, if you feel the need for a dinnertime soup for comfort or a lunchtime cockle warmer, here is my butternut, butter bean and bacon soup.

(4 to 6 servings (depending on whether it is a starter or main meal))

Ingredients:

100 g of dried butter beans, soaked in water overnight, then drained and boiled in fresh water for 40-45 mins or alternatively 1 tin of butter beans which have been drained
1 butternut squash, cut in quarters
1 white onion, very finely chopped
1 stick celery, very finely chopped
1 pack cubetti de pancetta or bacon pieces or lardons
1-3 cloves garlic, very finely chopped (how garlicky do you like it??)
1 tsp ground cumin
1 tsp ground coriander
1 litre stock (chicken preferably - don't use a cube, use either the liquid stuff (I recommend knorr touch of taste) or homemade)
1 potato peeled and diced very finely
olive oil

1. Cook and peel butternut squash as per my recent instructions:
2. Chop into fine dice
3. Fry onion, celery, and pancetta in olive oil for 5 mins
4. Add garlic and fry for about another 5 mins - until the onion and celery is soft
5. Add squash, butterbeans and spices and allow to heat through whilst stirring
6. When heated, add stock and potatoes
7. Cook for 10-15 mins
8. Blend with hand blender (or if you are flash, with a liquidiser)
9. Add a nice knob of butter (if you aren't watching your weight) and mix through. Creme Fraiche is a lower calorie substitute.
10. Serve with nice crusty bread

Enjoy!

From a recipe originally posted on Facebook by Snigdha Nag on Friday, 30 October 2009 at 20:52

Monday 13 June 2011

More use for Butternut Squash: Snigdha’s superfood salad

The wonderful restaurant chain Leon do an amazing superfood salad, featuring broccoli, alfalfa, peas, cucumber, avocado, quinoa, feta, fresh mint and parsley, toasted seeds and a pot of vinaigrette. It is fresh tasting, with zing, texture and flavour. It is also tremendously good for you.

Inspired by this dish, which has never left their menu since they first opened, I thought I would re-imagine some of the superfoods involved in this “party-in-a-dish”. Alfalfa sprouts are hard to come by and most of the time avocados are either too squishy or rock hard. So I wanted a recipe which can be easily made from things which are readily available but are healthy and tasty.

Apparently, those in the know tell us that foods which are orange or purple are good for you because they are high in natural antioxidants. So the super-tasty roasted butternut squash and sweet crunchy red onions will be doing you a power of good as well as teasing your taste buds. Needless to say the high veg count will give your digestive system a much needed workout!

I've already shown you how to roast butternut squash, so if you made the risotto I posted last, you probably have half a roasted squash waiting in the fridge to be used for this dish.

The pan-fried pancetta is there because him indoors is loath to eat too many wholly vegetarian meals. Add or leave in, as you feel.

(Serves 2)

Ingredients:
Fresh mint leaves, 1 handful, finely chopped
Frozen or fresh peas, about 1 small mug full
Cherry tomatoes, about 16, halved
Feta cheese, about 100g, crumbled
Salad leaf, about 50g
Broccoli florets, half a head cut into florets
Quinoa, 3 tablespoons
Red onion, 1 medium sized, sliced finely
Cooked beetroot (optional), about half, finely sliced
Half a cooked Butternut squash, cut into bite sized cubes

Topping ingredients:
Pancetta (optional), about 75g cubetti de pancetta
Sunflower seeds, 1 tablespoon
Pumpkin seeds, 1 tablespoon
Sesame seeds, 1 tablespoon

Dressing ingredients:
Olive oil, about 2-3 tablespoons
1 Lemon - juiced


Method
  1. Cook the butternut squash as per my instructions in my previous post: http://snigskitchen.blogspot.com/2011/06/how-to-roast-butternut-squash.html
  2. Then cook the quinoa. Since you are not making much, use the smallest pan you have. I used a milk pan. The rough amount of water you need is twice the amount of quinoa. So 6 tablespoons of cold water for the 3 tablespoons of quinoa. Put on the hob on a very low heat and cook for at least 12-15 mins. You will know it is cooked when a little curly fibre comes out of each seed. Don’t just leave the pan unattended – depending on how powerful your simmer setting is, you may need to add a little bit of water to prevent boiling dry. Stir around once cooked, take off the hob and allow to cool.
  3. Now cook your broccoli and peas. You can steam or boil them. I do them in the same pan, boiling the broccoli in plenty of water for 5 mins and then adding the peas for the final minute. Drain and rinse in cold water.
  4. If you are having the cubetti de pancetta, dry fry in a pan until thoroughly cooked.

  5. You will see the cubetti de pancetta are going brown around the edges. Remove from the pan and place on kitchen roll on a plate to absorb any excess fat.
  6. Now cook the seed topping. Heat a small pan until warm. Add the seeds. Cook for 2-3 mins, stirring as you go to achieve even colour. When some of the seeds start popping, turn the heat off straight away and transfer to a bowl.
  7. Whisk up the dressing with fork in a mug. Keep until needed.
  8. Now layer up the salad. Boiled veg first. This will be followed by salad leaf and crumbled feta. Now add the red onions and tomatoes. 

  9. Add the squash and herbs and Pancetta (if using).
  10. Re-whisk your dressing and drizzle all over.
  11. Now add the seed topping.

  12. Serve immediately and enjoy!